12月282014
[教程] 第十讲之分解3-纹理画刷
ACN论坛.讲师:seniors 转载请说明此文出处所在:<<简易工作室>>,谢谢!
纹理画刷
1、三种方式建立
_GDIPlus_TextureCreate($hImage[, $iWrapMode = 0])
_GDIPlus_TextureCreate2($hImage, $nX, $nY, $nWidth, $nHeight[, $iWrapMode = 0])
可以定义把图像的哪块区域作填充画刷
_GDIPlus_TextureCreateIA($hImage, $nX, $nY, $nWidth, $nHeight[, $hImageAttributes = 0])
可以定义图像属性$hImageAttributes,图像属性中,非但可以设置封装模式(WrapMode),还可以对图像颜色进行调整
$hImageAttributes要用_GDIPlus_ImageAttributesCreate()建立,在阿福验证码UDF中有使用过,要先行研究的可以去阿福那里去看
2、纹理画刷填充时,总是从0,0开始,所以要第一块就全贴,最好是_GDIPlus_GraphicsTranslateTransform画布移动时到位,使得你的填充区域的左上角坐标0,0才能贴好
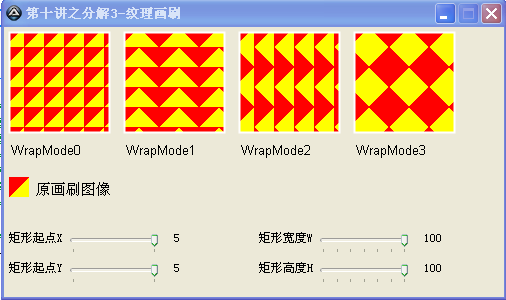
代码效果及代码
#include <APIConstants.au3>
#include <WinAPIEx.au3>
#include <GDIPlus.au3>
#include <GDIPlusEx.au3>
Global $rectx = 5, $recty = 5, $rectw = 100, $recth = 100
GUICreate("第十讲之分解3-纹理画刷", 500, 270)
$nCtrlId = GUICtrlCreatePic("", 0, 0, 500, 200)
$hPicWnd = GUICtrlGetHandle($nCtrlId)
Global $rect[4][2]
init()
GUIRegisterMsg($WM_HSCROLL, "onHSCROLL")
GUISetState()
update()
While 1
$Msg = GUIGetMsg()
Switch $Msg
Case -3
ExitLoop
EndSwitch
WEnd
GUIDelete()
Exit
Func init()
GUICtrlCreateLabel("矩形起点X", 5, 205)
$rect[0][0] = GUICtrlCreateSlider(60, 205, 100)
GUICtrlSetLimit(-1, $rectx, 0)
GUICtrlSetData(-1, $rectx)
$rect[0][1] = GUICtrlCreateLabel("", 170, 205, 40, 25)
GUICtrlSetData(-1, $rectx)
GUICtrlCreateLabel("矩形起点Y", 5, 235)
$rect[1][0] = GUICtrlCreateSlider(60, 235, 100)
GUICtrlSetLimit(-1, $recty, 0)
GUICtrlSetData(-1, $recty)
$rect[1][1] = GUICtrlCreateLabel("", 170, 235, 40, 25)
GUICtrlSetData(-1, $recty)
GUICtrlCreateLabel("矩形宽度W", 255, 205)
$rect[2][0] = GUICtrlCreateSlider(310, 205, 100)
GUICtrlSetLimit(-1, $rectw, 40)
GUICtrlSetData(-1, $rectw)
$rect[2][1] = GUICtrlCreateLabel("", 420, 205, 40, 25)
GUICtrlSetData(-1, $rectw)
GUICtrlCreateLabel("矩形高度H", 255, 235)
$rect[3][0] = GUICtrlCreateSlider(310, 235, 100)
GUICtrlSetLimit(-1, $recth, 40)
GUICtrlSetData(-1, $recth)
$rect[3][1] = GUICtrlCreateLabel("", 420, 235, 40, 25)
GUICtrlSetData(-1, $recth)
EndFunc ;==>init
Func onHSCROLL($hWnd, $iMsg, $wParam, $lParam)
Switch $lParam
Case GUICtrlGetHandle($rect[0][0])
$rectx = GUICtrlRead($rect[0][0])
GUICtrlSetData($rect[0][1], $rectx)
Case GUICtrlGetHandle($rect[1][0])
$recty = GUICtrlRead($rect[1][0])
GUICtrlSetData($rect[1][1], $recty)
Case GUICtrlGetHandle($rect[2][0])
$rectw = GUICtrlRead($rect[2][0])
GUICtrlSetData($rect[2][1], $rectw)
Case GUICtrlGetHandle($rect[3][0])
$recth = GUICtrlRead($rect[3][0])
GUICtrlSetData($rect[3][1], $recth)
EndSwitch
update()
EndFunc ;==>onHSCROLL
Func update()
Local $HWND_CX = _WinAPI_GetWindowWidth($hPicWnd)
Local $HWND_CY = _WinAPI_GetWindowHeight($hPicWnd)
_GDIPlus_Startup()
$hGraphics = _GDIPlus_GraphicsCreateFromHWND($hPicWnd)
$hBitmap = _GDIPlus_BitmapCreateFromGraphics($HWND_CX, $HWND_CY, $hGraphics)
$hBackbuffer = _GDIPlus_ImageGetGraphicsContext($hBitmap)
_GDIPlus_GraphicsClear($hBackbuffer, 0xFFECE9D8)
_GDIPlus_GraphicsSetSmoothingMode($hBackbuffer, 2);光滑模式,2为8*8抗距齿
TextureBrushComp($hBackbuffer)
_GDIPlus_GraphicsDrawImageRect($hGraphics, $hBitmap, 0, 0, $HWND_CX, $HWND_CY)
_GDIPlus_BitmapDispose($hBitmap)
_GDIPlus_GraphicsDispose($hBackbuffer)
_GDIPlus_GraphicsDispose($hGraphics)
_GDIPlus_Shutdown()
EndFunc ;==>update
Func TextureBrushComp($hGraphics)
;构建纹理画刷图像$hBrushBitmap,它是一个20*20的红黄图像
Local $hBrushBitmap = _GDIPlus_BitmapCreateFromGraphics(20, 20, $hGraphics)
Local $hContext = _GDIPlus_ImageGetGraphicsContext($hBrushBitmap)
Local $aPoints[4][2] = [[3, 3],[0, 0],[0, 20],[20, 0]]
Local $bPoints[4][2] = [[3, 3],[0, 20],[20, 0],[20, 20]]
$hBrush = _GDIPlus_BrushCreateSolid(0xFFFF0000)
_GDIPlus_GraphicsFillPolygon($hContext, $aPoints, $hBrush);填充红色三角形
_GDIPlus_BrushDispose($hBrush)
$hBrush = _GDIPlus_BrushCreateSolid(0xFFFFFF00)
_GDIPlus_GraphicsFillPolygon($hContext, $bPoints, $hBrush);填充黄色三角形
_GDIPlus_BrushDispose($hBrush)
_GDIPlus_GraphicsDispose($hContext)
;构建纹理画刷图像$hBrushBitmap结束
Local $hPen = _GDIPlus_PenCreate(0xFFFFFFFF, 2);填充矩形区域描边用白色画笔
Local $hBrush
;下面是4种填充方式的对比,0是不翻转,1是水平翻转,2 是垂直翻转,3是水平垂直均翻转,其中4是不铺设,所以不演示了
;水平翻转就是到超过画刷高到第二行时,水平翻转
;垂直翻转就是到超过画刷宽到第二列时,垂直翻转
;============================================================
;说明:纹理画刷填充时,总是从0,0开始,所以要第一块就全贴,最好是_GDIPlus_GraphicsTranslateTransform画布移动时到位
;也就是矩形的左上坐标0,0才能贴好
;============================================================
Local $hPath = _GDIPlus_PathCreate()
;$rectx, $recty, $rectw, $recth分别是矩形路径的起点XY坐标,及宽高
_GDIPlus_PathAddRectangle($hPath, $rectx, $recty, $rectw, $recth)
For $i = 0 To 3
$hBrush = _GDIPlus_TextureCreate($hBrushBitmap, $i);以$hBrushBitmap红黄图象为填充画刷,WrapMode为$i
_GraphicsFillPath($hGraphics, $hPath, $hBrush)
_GraphicsDrawPath($hGraphics, $hPath, $hPen)
_GDIPlus_BrushDispose($hBrush)
_GraphicsDrawString($hGraphics, "WrapMode" & $i, $rectx, $recty + $recth + 10)
_GDIPlus_GraphicsTranslateTransform($hGraphics, $rectx + $rectw + 10, 0)
Next
_GDIPlus_PathDispose($hPath)
_GDIPlus_PenDispose($hPen)
;复位画布
_GDIPlus_GraphicsResetTransform($hGraphics)
_GDIPlus_GraphicsTranslateTransform($hGraphics, 0, $recty + $recth + 40)
;================================绘制原画刷样子
_GDIPlus_GraphicsDrawImageRect($hGraphics, $hBrushBitmap, 5, 5, 20, 20)
_GraphicsDrawString($hGraphics, "原画刷图像", 30, 10)
_GDIPlus_ImageDispose($hBrushBitmap)
EndFunc ;==>TextureBrushComp
;_GDIPlus_GraphicsDrawString这个函数,我认为他没有设置$hBrush,所以我改成这样就可以用不同的画刷了
Func _GraphicsDrawString($hGraphics, $sString, $nX, $nY, $hBrush = 0, $sFont = "Arial", $nSize = 10, $iFormat = 0)
Local $hFormat = _GDIPlus_StringFormatCreate($iFormat)
Local $hFamily = _GDIPlus_FontFamilyCreate($sFont)
Local $hFont = _GDIPlus_FontCreate($hFamily, $nSize)
Local $tLayout = _GDIPlus_RectFCreate($nX, $nY, 0, 0)
Local $aInfo = _GDIPlus_GraphicsMeasureString($hGraphics, $sString, $hFont, $tLayout, $hFormat)
__GDIPlus_BrushDefCreate($hBrush)
Local $aResult = _GDIPlus_GraphicsDrawStringEx($hGraphics, $sString, $hFont, $aInfo[0], $hFormat, $hBrush)
Local $iError = @error
__GDIPlus_BrushDefDispose()
_GDIPlus_FontDispose($hFont)
_GDIPlus_FontFamilyDispose($hFamily)
_GDIPlus_StringFormatDispose($hFormat)
Return SetError($iError, 0, $aResult)
EndFunc ;==>_GraphicsDrawString
;下面这两个描路径和填充路径,在3.3.9.5中已经更正了,我用的是3.3.7.15画笔和画刷设置不对,可以改成这样的就行了
Func _GraphicsDrawPath($hGraphics, $hPath, $hPen = 0)
Local $iTmpErr, $iTmpExt, $aResult
__GDIPlus_PenDefCreate($hPen)
$aResult = DllCall($ghGDIPDll, "uint", "GdipDrawPath", "hwnd", $hGraphics, "hwnd", $hPen, "hwnd", $hPath)
$iTmpErr = @error
$iTmpExt = @extended
__GDIPlus_PenDefDispose()
If $iTmpErr Then Return SetError($iTmpErr, $iTmpExt, False)
$GDIP_STATUS = $aResult[0]
Return $aResult[0] = 0
EndFunc ;==>_GraphicsDrawPath
Func _GraphicsFillPath($hGraphics, $hPath, $hBrush = 0)
Local $iTmpErr, $iTmpExt, $aResult
__GDIPlus_BrushDefCreate($hBrush)
$aResult = DllCall($ghGDIPDll, "uint", "GdipFillPath", "hwnd", $hGraphics, "hwnd", $hBrush, "hwnd", $hPath)
$iTmpErr = @error
$iTmpExt = @extended
__GDIPlus_BrushDefDispose()
If $iTmpErr Then Return SetError($iTmpErr, $iTmpExt, False)
$GDIP_STATUS = $aResult[0]
Return $aResult[0] = 0
EndFunc ;==>_GraphicsFillPath```
扫描二维码,在手机上阅读


